Device connections
This sections walks you through how to single sign-on to a devices tool and execute tasks on device(s) and covers:
Device states
Each device is regularly monitored to determine its availability. The colour of the device presented to you will highlight the devices current state.
| Indicator | Description |
|---|---|
| The device can be successfully accessed. | |
| Some tasks running on the device are showing errors. | |
| Unable to make a connection to the device. | |
| This device is not managed by Osirium PAM but the device credentials are saved within Osirium PAM. The only tool available to this device is Reveal Credentials. |
Device tools
The device tool available to make a connection to a device is determined by the device type. The following table describes the different device tools that maybe used by devices to make a connection.
| Icon | Description |
|---|---|
| Session will be launched within a browser window. | |
| Session will be launched using a remote desktop tool. | |
| Session will be launched using an SSH client. | |
| Session will be launched using a remote application tool. | |
| Session will be launching using an SFTP protocol tool. |
Approval Requests
Devices that require approval before they can be accessed will be greyed out and have a ![]() icon along side it. To connect to the device you will have to submit a request for access. Once approved the device will no longer be greyed out and you will be able to connect to the device tool/task within the requested scheduled time frame.
icon along side it. To connect to the device you will have to submit a request for access. Once approved the device will no longer be greyed out and you will be able to connect to the device tool/task within the requested scheduled time frame.

Single signing onto device tools
A device tool can be launched by clicking on it from the list. The authentication and single sign-on process is handled by Osirium PAM so you won't be prompted to enter any credentials.
Note
If your tool is greyed out then it may require you to Request Access.
The credentials used to sign-on to the device will have a predefined access level. The access level can be seen next to the tool. This access level will determine the level of permission and privilege granted to you for the device session and it is set by your SuperAdmin.
The device tool will open once successfully authenticated. You are now ready to commence with your work on the device.
Change Tickets
Some device/task access maybe linked to change tickets which will allow access only after a change ticket is entered or you may choose to enter a change ticket against the work you are about to carry out. The change ticket will be used to track access and monitor work carried out.
Entering a change ticket:
-
Click on the device tool. If a change ticket is required then you will be presented with the Change Ticket Required window.
Note
If you are not presented with the Change Ticket Required window but would like to log the work against a change ticket then click on the
 icon.
icon. -
Click
YESto proceed. If you clickNOthe Change Ticket Required window will close and you won't gain access to the device tool selected. -
Within the Change Ticket - Acquire Ticket window, fill in the following information:
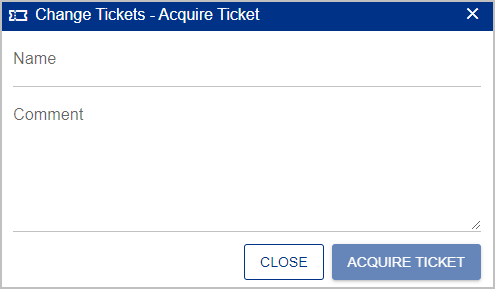
Field Description Name Enter a name to easily identify the change. This can be a change ticket reference number or ID. Comment Enter a comment relating to the change ticket. -
Once the information has been entered, click
ACQUIRE TICKET. You will be logged onto the device. You can now carry out the work as specified on the change ticket. -
Within the device session window, you can view the change ticket that you are currently working under by clicking on
. -
Within the Change Tickets - Active Ticket window you can:
-
View the current change ticket you are working under.
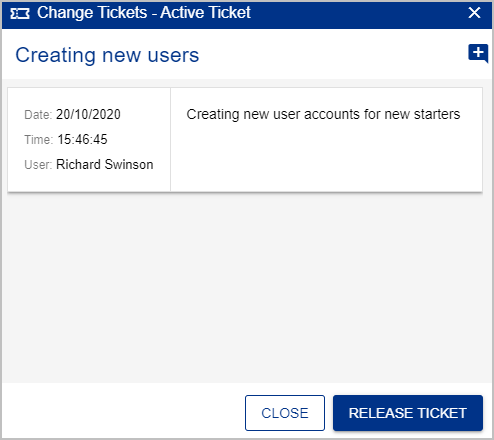
-
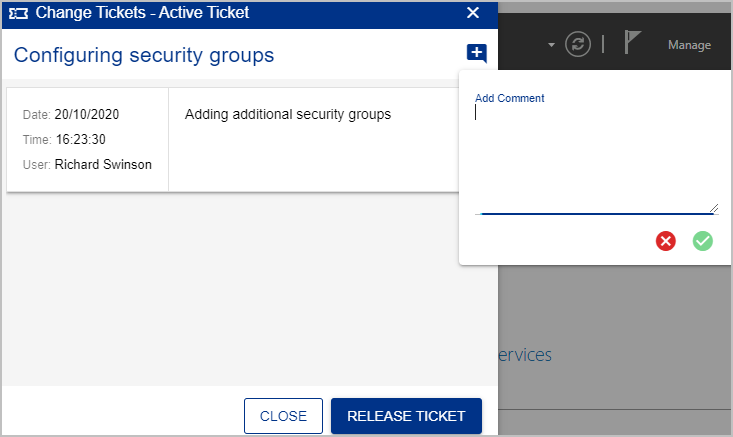
Add additional comments to the ticket by clicking on the plus.
-
When you have completed your work under the ticket, click
RELEASE TICKET. This will close the ticket and the device session.
-
Session recording
Session recording is a tool that is used to record device session activities. Sessions being recorded can be viewed in real-time by your SuperAdmins and saved recorded sessions are available for playback and viewing at anytime.
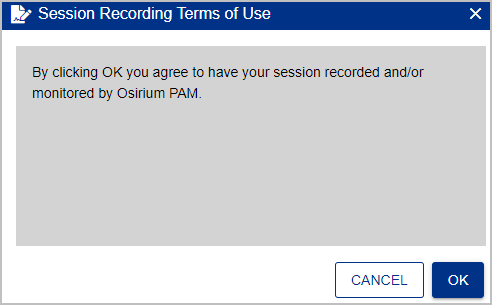
Before your session starts you maybe prompted with a Session Recording Terms of Use window, if one has been configured. If configured, you will need to accept the agreement in order to proceed to your device session.
When you have been successfully logged onto the session a ![]() icon will appear in the top left-hand corner of the device session window to indicate that all your activities during the session will be recorded.
icon will appear in the top left-hand corner of the device session window to indicate that all your activities during the session will be recorded.
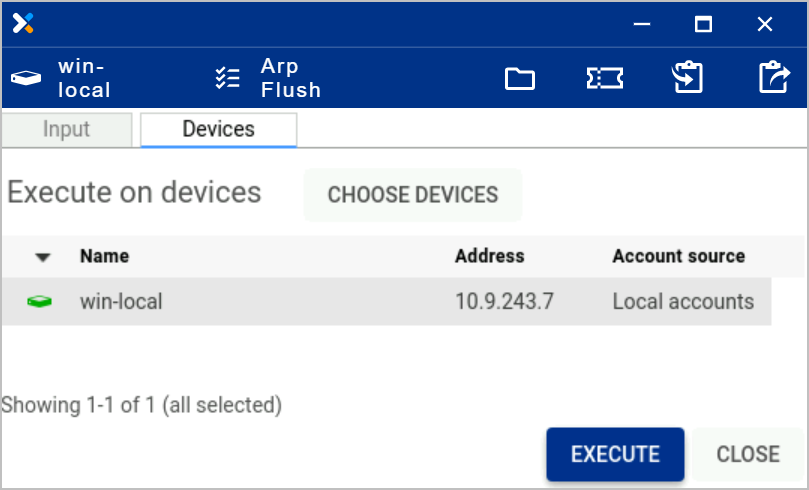
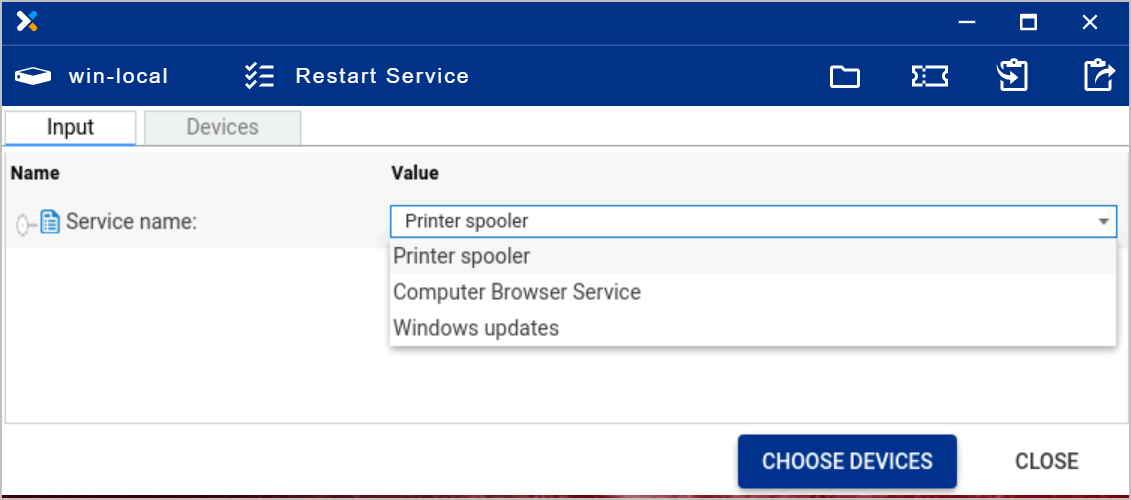
Executing device tasks
The execution of tasks refers to commands that can be run on a device to perform a set action. Osirium PAM lists the tasks you have been granted access to and have permission to execute on the device. You do not need to know the command when executing the task as Osirium PAM provides this information.
Note
If your tool is greyed out then it may require a Request Approval.
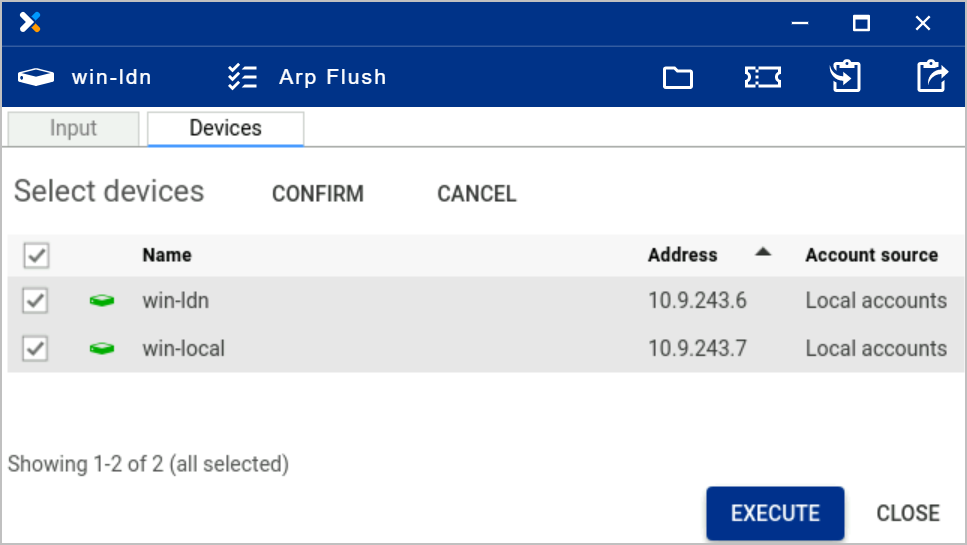
A task can also be executed on multiple devices of the same type. This saves time and effort of logging onto each device and running the task individually.
Available tasks can be executed in a variety of forms, these include:
- One click: no input required.
- Data collection: a value is read from the device and the output presented within a window.
- Free input field: requires a value to be entered before the task can be executed.
- Dropdown list box: requires a selection to be made from a predefined list.
To execute a task:
-
Click the
 task icon which can be found listed under the device name.
 -
The task is opened.
-
No input task: If the task doesn't require an input then you will be asked to select a device.
-
Task input required: If the task requires an input you will be presented with the Input tab and asked to select a value.
-
-
Select one or more devices from the list on which you want to run the task.
-
Click
CONFIRM. -
Click
EXECUTEto run the task on the selected devices. -
Within the Question window, click
YES. -
Wait while the task is executed. Progress can be seen in the Action queue window. When you have finished click
DONE.If you have run a task that creates a file, you will be presented with the Output files tab.
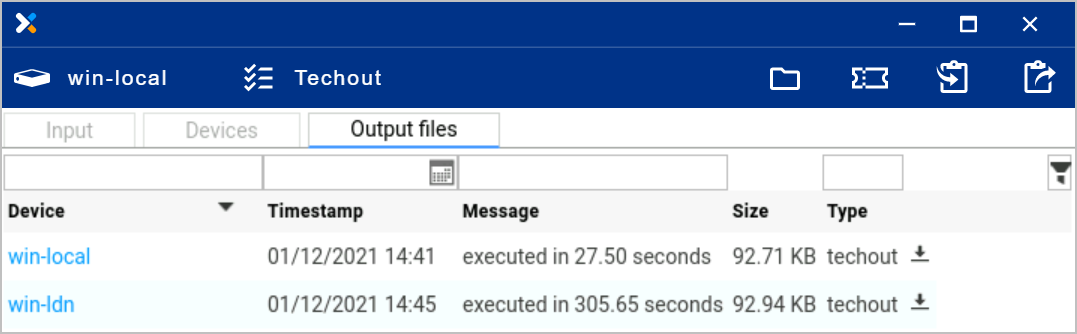
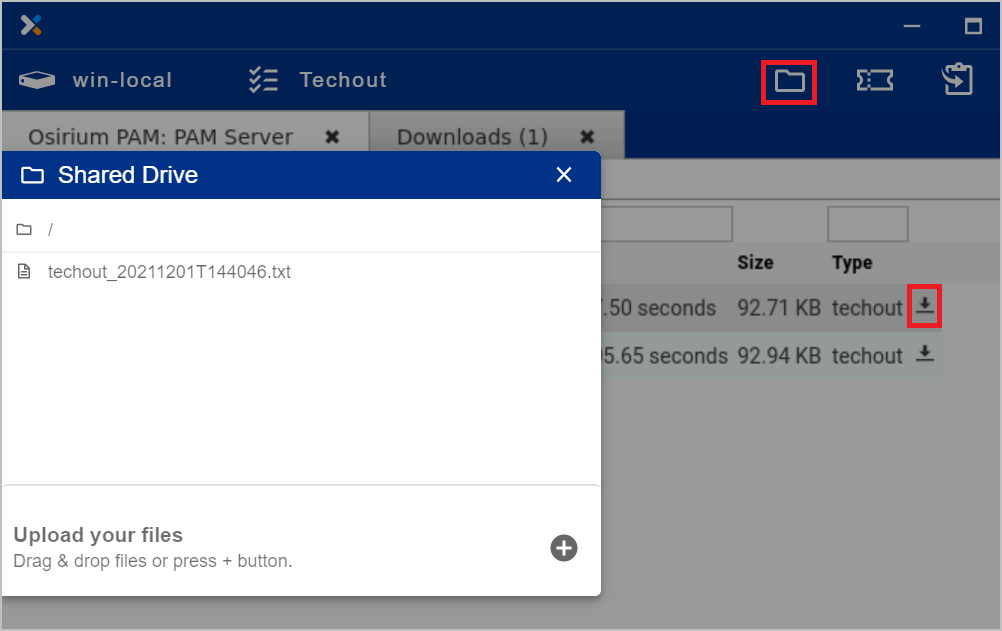
-
From here you can download the file by clicking on download icon and then from the Shared Drive click on the file to download to your local computer.
-
Close the windows when finished.
Native tool menu actions
When you are using PAM (with tools set to launch with the Osirium PAM built-in tools), a blue menu bar will be visible at the top of the session window. This menu bar contains a number of actions which can be performed within the session.

The actions available in the menu bar include:
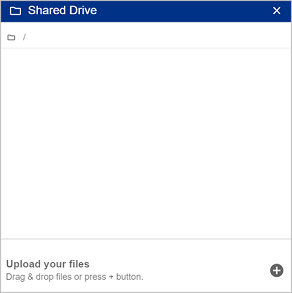
Shared Drive
The Shared Drive mechanism will allow you to perform the following actions from the device session.
File Sharing
All device sessions, with the exception of SSH, allow for file sharing to be performed between the local machine and the remote session.
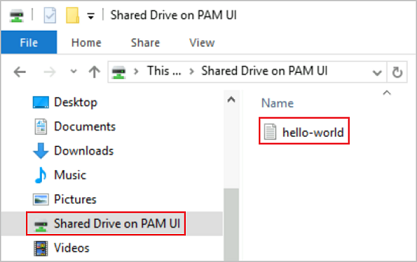
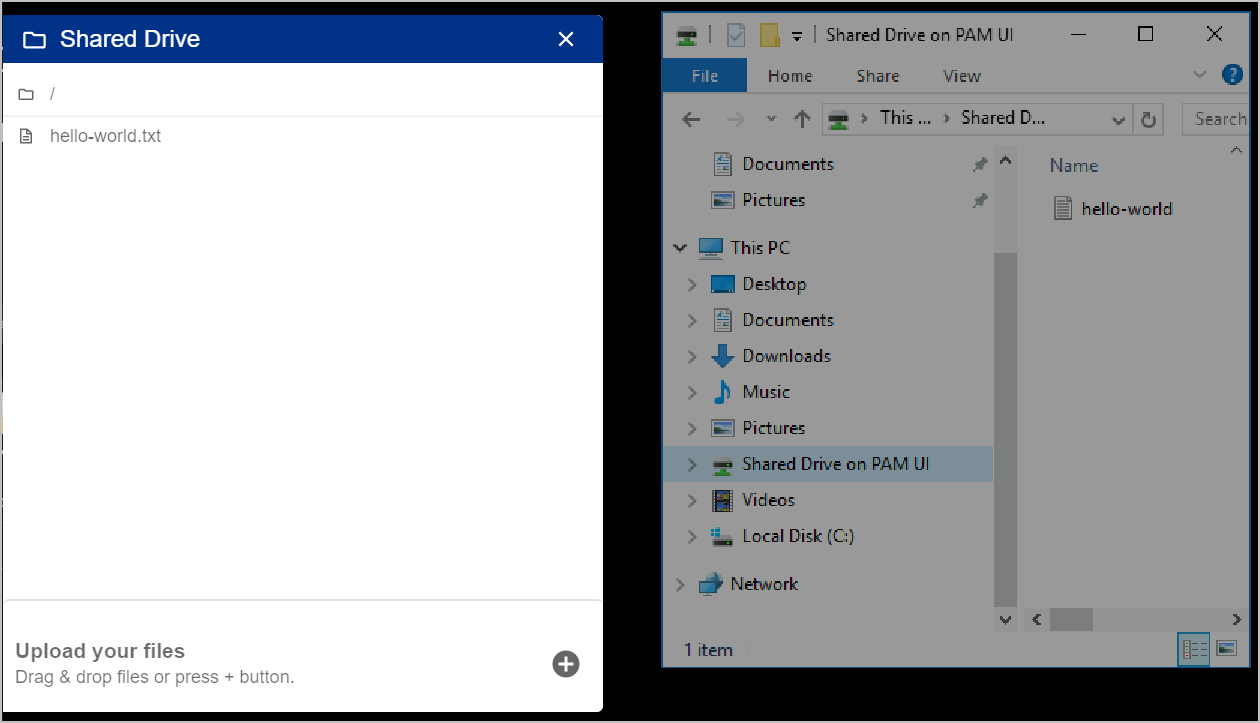
For Remote Desktop / Remote Application the Shared Drive on PAM UI mapped network drive can be viewed in your File Explorer window within your device session.

For HTTP(s) / Tasks the file sharing folder is created dynamically with a unique ID with the session name. The download operations inside this session will download files to this folder, and the upload dialog will automatically open on this folder as well.
Secure File Transfer (SFTP) uses a shared folder within a Filezilla SFTP client.
The files and folders available in the shared drive can be accessed locally by using the Shared Files window which can be accessed by clicking on the ![]() icon located in the top right hand corner.
icon located in the top right hand corner.
Downloading a File
The following instructions allow you to download a file from your remote session to your local machine.
-
Within the Remote Desktop window, open up a File Explorer window.
-
From the File Explorer window, copy the file you wish to download into the Shared on PAM UI folder.
-
Now click on the
 icon located in the top right hand corner.
 -
The Shared Drive window will open. You will see the file copied to the Shared Drive on PAM UI folder is listed.
-
To download the file to your local machine simply click on the file within the Shared Drive window. The file will be downloaded by the browser.
Uploading a File
The following instructions allow you to upload a file from your local machine to your remote session.
Note
For a file to be uploaded the appliances internal disk must have sufficient free space available.
-
Within the Remote Desktop window, click
located in the top right hand corner. The Shared Drive window will open. -
Within the Shared Drive window, either drag and drop the file(s) from your local machine to the Shared Drive window or use the
 to open your local machine File Explorer window and select the files to be uploaded onto the remote session.
 -
Once the file has been successfully uploaded it will be available in the Shared on PAM UI folder on your remote session.
Ctrl-Alt-Delete Command
The ![]() icon allows you to send the Ctrl-Alt-Del computer keyboard command within your remote desktop session.
icon allows you to send the Ctrl-Alt-Del computer keyboard command within your remote desktop session.
Change Ticket Updates
-
Within the device session window, you can view the change ticket by clicking on
. -
Within the Change Tickets - Active Ticket window you can:
-
View the current change ticket you are working under.
-
Add additional comments to the ticket by clicking on the plus.
-
When you have completed your work under the ticket, click
RELEASE TICKET. This will close the ticket and the device session.
-
Copy and Paste
This functionality will allow you to copy and paste content between your local machines clipboard and the clipboard on the remote session you are connected to.
To copy from your local clipboard and paste into your remote session
-
Make sure the content you wish to copy is in the clipboard of your local machine.
-
Within the Remote Desktop window, click on the object you want to paste the content into and then click
 . The copied text from your local machine clipboard is pasted into the remote session window.
To copy from your remote session clipboard and paste into your local machine
-
Within your remote session, select the text you want to copy and click
 .
. -
On your local machine, open the window you wish to paste the copied text into and press CTRL+V to paste. The copied text from the remote session clipboard is pasted into the local machine window.
Seamless clipboard
The latest version of Chrome is capable of supporting seamless clipboard which provides seamless interoperability between the local and remote clipboards. When this feature is supported the clipboards will be kept in sync without manual intervention, allowing for seamless copy and paste operations across both.