Managing user groups
This section describes how Osirium PAM user groups are created and managed within the Admin Interface, covering the following:
- What are user groups?
- How to create a new user group
- How to associate users and profiles
- Bulk importing
- Editing a user group
- Deleting a user group
What are user groups?
A user group creates a container that can then be used to associate users and profiles. Working with groups instead of with individual users allows you to simplify the process of giving members of a group, organisation, team, department etc, the same privilege levels required to perform a job role.
User groups minimises the risk of missing people off the access list as well as making it easier to update or quickly remove access if it is no longer required for the group.
User groups are created and managed via the Manage user groups page. The process of creating a user group and then associating users is as follows:
-
Create a user group container with a preferred user source and a name to help identify the group.
The source selected will determine the user list presented for association:
-
Local: will allow you to select and add users with any auth type.
-
Active Directory: will synchronise the users belonging to the Active Directory Global Security Group.
-
-
Associate users (local or Active Directory): For local source user groups, select the users from the list presented.
For an Active Directory source user group, users will be automatically synchronised from Active Directory. Active Directory users that are currently not listed within the Manage users page will be created.
Active Directory users can't be updated or deleted from within Osirium PAM. Updates to user groups at the Active Directory level need to be synchronised with Osirium PAM in order for changes to be reflected.
-
Associate profiles: Either select from the profiles that already exist or create a new profile with the access privileges required for the user group. Adding a profile to the user group will give all the users in the user group access to the devices and tasks listed in the profile with the access level stated. User groups can be added to multiple profiles.
How to create a new user group
Creating a user group creates a container that can then be used to associate users and profiles.
-
Click the

NEW USER GROUPbutton on the Manage user groups page. -
Fill in the following details:
Heading Description Source Select the source of the users. Name Enter a display name that will be used to identify the user group. When using an Active Directory source: The name must match that of a Global Security Group that exists on Active Directory.
Notes Add any additional information that maybe relevant or useful to manage the user group.  Enabled
If the checkbox is  then the user group is enabled.
When added to a profile, the users within the group will be given permission to the devices.
NOTE If an Active Directory user group is created in a disabled state, the users will not be synchronised until the group is enabled.
-
Click
SAVE. The user group container is created. If you selected an Active Directory source, a Note window is displayed.
How to associate users and profiles
This page allows you to manage and configure the users and profiles that are associated with the user group.
- To add users to a local source user group
- To synchronise users from an Active Directory Global Security Group
- To add profiles to user groups
To add users to a local source user group
-
On the User group detail page, click the
MANAGEbutton to the right of Associated users. -
The Manager: users window opens, select the checkboxes for the users to be added to the group.
-
Click
SAVE CHANGES. The users are added to the user group.
To synchronise users from an Active Directory Global Security Group
The first time you create a user group with an Active Directory Account source, the users will be automatically synchronised. To check for updates to the user group you can use the Synchronise button. Any changes that have been made to the Active Directory Global Security Group will be updated in Osirium PAM.
To add profiles to user groups
-
On the Named user group detail page, click the
MANAGEbutton to the right of Associated profiles. -
Within the Manager: profiles window, select the checkboxes for the profiles to be added to the group.
-
Click
SAVE CHANGES. The Profile user update task will be executed.The profile will be updated to include the user group. All users listed in the user group will be given the same privileged access levels configured within the profile.
Bulk importing
If you have a number of user groups to create you can use the csv template and then import your user group list. This is a more effective and quicker way of creating multiple user groups as well as adding membership to user groups.
A bulk import can be used to create new user groups or add/update existing user group memberships (associated users and associated profiles).
- Bulk importing user groups: to create a new user group.
- Bulk importing user groups membership: to add/amend user group memberships for new and existing user groups.
Bulk importing user groups
To bulk import multiple user groups:
-
Select the
User groupsfrom the left-hand menu. -
On the Manage user groups page, click

BULK IMPORTand select Import user groups from the menu. -
Within the Import from CSV window, click
DOWNLOAD CSV TEMPLATE.If the PAM Server Browser (HTTP) tool is being session recorded, then you will need to use the Shared Drive mechanism for downloading files. For further details see Downloading a file using Shared Drive.
-
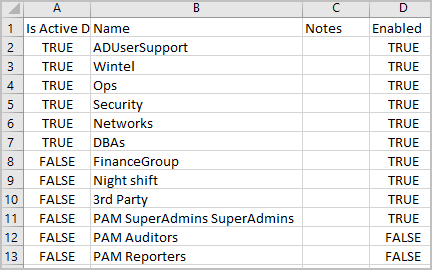
Open the user_groups_[date].csv file. You will see an example given to follow the inputs required.
-
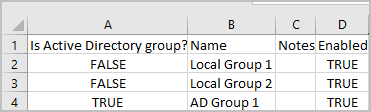
Add in your user groups to be imported as follows:
Column heading Description Is Active Directory group? Enter TRUE for an Active Directory Global Security Group or FALSE to select from the Osirium PAM list of users. Name Enter a display name that will be used to identify the user group. When using an Active Directory source: The name must match that of a Global Security Group that exists on Active Directory.
Notes Add any additional information that may be useful. Enabled Enter TRUE to enable the user group when created. Enter FALSE to disable the user group when created.
NOTE Disabling a user group will dynamically revoke any permissions allocated through profiles.
For example:
-
Save the csv file once updated.
-
Now within the Import from CSV window, click
Choose File.If the PAM Server Browser (HTTP) tool is being session recorded, then you will need to use the Shared Drive mechanism for uploading files. For further details see Uploading a file using Shared Drive.
-
Click
IMPORT. -
The entries in the CSV file are added and visible in the Bulk import user groups window.
-
Before you click
IMPORTnote the following.-
To import all the user groups listed, click the

SELECT ALL. -
To import only a selection of user groups from the list, hold the SHIFT key and select all the groups you want to import from your bulk import list.
-
Errors will be highlighted with an
 .
. -
If warnings are not fixed then you will get an error when you click
IMPORT. -
You can select the Skip rows with errors to ignore the rows with errors and import all the others.
-
You can update any user group settings by clicking on the
 at the end of each row.
 -
If there are no errors highlighted then all user groups will be imported in the list.
-
To disable a user group when created, click
at the end of the row and deselect the Enabledcheckbox.
-
-
Click
IMPORT. -
Within the Question window, click
YESif you are happy to proceed with the bulk import.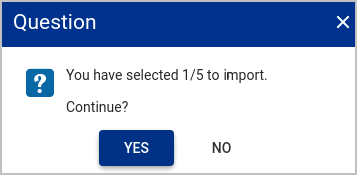
-
Within the Action queue window, the user groups will be imported and queued for creation. If you have a lot of users in your bulk import then you can choose to
Continue in the backgroundor if the imports have been completed, clickDONE.The Manage user groups page will automatically be updated. User data will be synchronised for any users groups with a source of Active Directory. If the user doesn't exist in Osirium PAM it will be created. All associated users within the Active Directory Global Security Group will be listed.
Bulk importing user groups membership
You can use the exported user group csv file to associate users to existing user group containers but there are some limitations:
-
You can't associate profiles.
-
The Bulk import > Import user groups membership > Download CSV template is not currently available.
-
Don't use for user groups with a source of Active Directory.
The following method can be used to bulk import user associations to user groups:
-
Within the Manage user groups page, click on

EXPORT. -
Select Export user groups membership.
If the PAM Server Browser (HTTP) tool is being session recorded, then you will need to use the Shared Drive mechanism for downloading files. For further details see Downloading a file using Shared Drive.
-
Open the user_groups_member_[date].csv file. The file will contain all the user groups with a local and Active Directory source and their associated users.
-
Update the csv file as follows:
-
Remove all user groups with an account source of Active Directory as they can only be synchronised.
-
To associate users to existing user groups enter the following information into the csv file.
Column heading Description User group Enter the user group name that already exists. User Enter the Name of the user as listed on the Manage users page. Users with Auth type other than Active Directory can be added to a local source user group. Note
DO NOT enter multiple names in a field. To add multiple users to the same user group create a new row for each user group.
If you remove an existing associated user from the bulk import template and then import, the removed user will be be deleted from the associated users list. -
-
Save the csv file.
-
Now within the Import from CSV window, click
Choose File.If the PAM Server Browser (HTTP) tool is being session recorded, then you will need to use the Shared Drive mechanism for uploading files. For further details see Uploading a file using Shared Drive.
-
Click
IMPORT. -
The entries in the CSV file are added and displayed in the Bulk import user group membership window.
-
Before you click
IMPORTnote the following.-
To import all the user groups listed, click the
SELECT ALL. -
To import only a selection of user group memberships from the list, hold the SHIFT key and select all the groups you want to import from your bulk import list.
-
Errors will be highlighted with a
. -
If warnings are not fixed then you will get an error when you click
IMPORT. -
You can select the Skip rows with errors to ignore the rows with errors and import all the others.
-
You can update any row by clicking on the
at the end of each row. -
If there are no errors highlighted then all entries will be imported in the list.
-
-
Click
IMPORT. -
Within the Question window, click
YESif you are happy to proceed with the bulk import of the memberships. -
Within the Action queue window, the user group memberships will be imported and queued for creation. If you have a lot of user group memberships in your bulk import then you can choose to
Continue in the backgroundor if the imports have been completed, clickDone..The Manage user groups page will be automatically updated.
Editing a user group
See the Common Interface functions section for inline editing.
Deleting a user group
Deleting a user group will:
- The user group will be permanently removed from the database.
- The user group will be removed from all profiles associated in the user group.
- Users access levels will be revoked for all devices and device tasks within the profiles associated with the deleted user group.
- User account will not be deleted from Osirium PAM.