PAM Server inline standalone upgrade procedure
This section looks at how to inline upgrade a standalone deployment. If you have a clustered environment click here.
Prerequisites
Before starting your standalone inline upgrade make sure the following prerequisites are met:
| Prerequisite | Description |
|---|---|
| Upgrade path | Review the Standalone upgrade path to ensure you are applying the correct upgrade method based on the version you are upgrading from and to. |
| Hardware & Software | Ensure the correct resources are available before upgrading. The following outlines the hardware and software requirements. |
| Software downloads | Download the latest upgrade kit click here. |
| Disk space | Ensure the internal disk has a minimum of 5GB free disk space. |
| Recent backup | We recommend that you have a recent Osirium backup as well as VM Level backup or Snapshot of the PAM Server being upgraded. |
| No active user connections | Ensure there are no active user connections. |
| Regenerate Account Credentials for all devices tasks | Within the Admin Interface, disable all scheduled Regenerate Account Credentials for all devices tasks within profiles. |
| Osirium Support account | Within the Admin Interface ensure the Osirium Support account has been enabled and a password set. |
| .local DNS domains | If you are using .local DNS domains, ensure matching records have been entered in the DNS Search Suffixes. |
Upgrade procedure
The diagram provides a high-level overview of the process for upgrading a standalone PAM Server.
Standalone PAM Server upgrade procedure flowchart
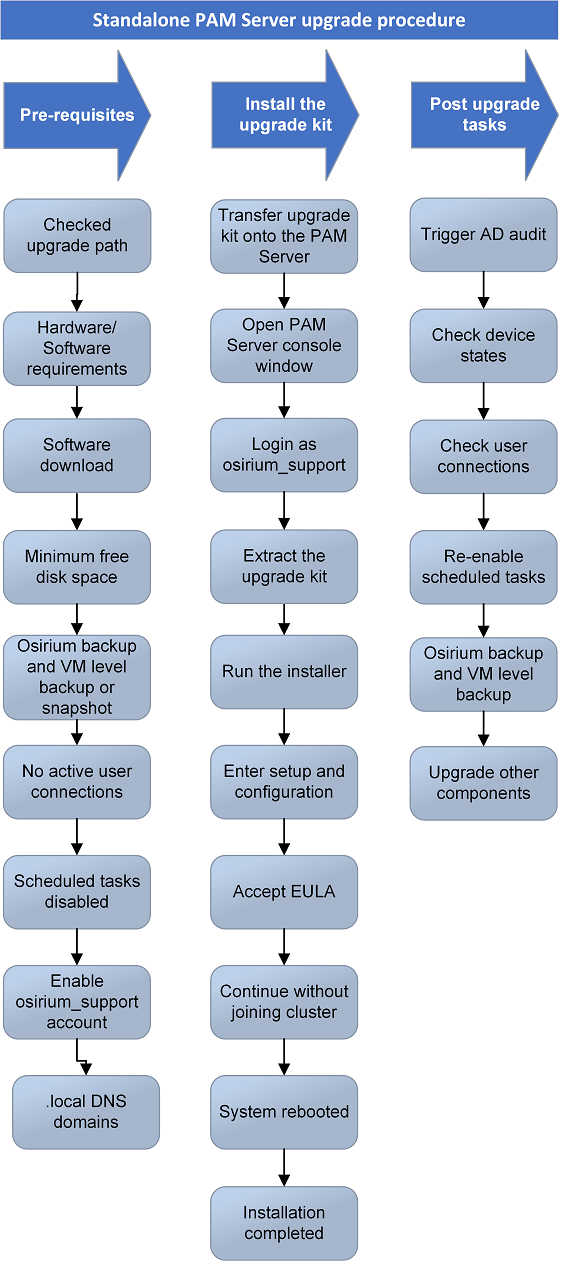
Upgrade steps
-
Open a file transfer tool of your preference and copy the upgrade kit onto the PAM Server using the osirium_support account.
-
Open the PAM Server Console window, then press ALT + F2. The server login prompt appears.
Note
Alternatively, you could use an SSH connection to the PAM Server.

-
Enter osirium_support at the login prompt and press ENTER.
-
When prompted, enter the password of the osirium_support account and press ENTER.
-
Extract the upgrade kit copied to the server using the following command:
sudo bash Osirium_PAM_Server_vA.B.C_upgrade.binWhere A.B.C is the version you are upgrading to.
-
Enter the osirium_support account password when prompted and press ENTER.
-
When the kit has been extracted, type the command specified on the screen and press ENTER.
-
Press ENTER when prompted to start the setup and configuration.
-
The EULA screen will be displayed. Press ENTER once you have read it.
-
If you are upgrading to a release when only the third number has changed i.e. A.B.x to A.B.y then skip to Step 12.
-
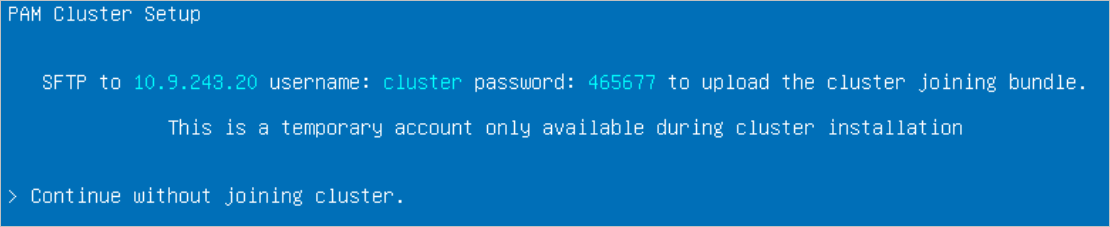
Press ENTER when prompted to Continue without joining cluster.
-
Wait while the upgrade completes and the server is rebooted.
Post upgrade tasks
Once the standalone upgrade has successfully completed, logon to Osirium PAM and check the following before allowing users to reconnect:
| Post upgrade task | Description |
|---|---|
| Trigger AD audit | Before opening any device connections that use an Active Directory account, an audit needs to be manually triggered on all provisioned Active Directories. You can do this by right clicking the Active Directory on the Manage Active Directory page, and select Trigger audit from the menu. This will allow additional fields on the Active Directory account page to be populated. |
| Check device states | Check device status to ensure they are running successfully. |
| Check user connections | Check users can connect to devices. |
| Re-enable scheduled tasks | Re-enable scheduled Regenerate Account Credentials for all devices tasks. |
| Backup | Take an Osirium backup as well as VM Level backup of the upgraded PAM Server. See Backup & Recovery for further details. |
| Upgrade other components | Use the PAM Component Compatibility Matrix to check if other PAM components need updating inline with the version you are upgrading to and upgrade as appropriate. |