Recovering PAM HA
This section looks at how to recover a failed PAM Server that is part of a HA Pair.
- Introduction
- Active Primary PAM Server Fails
- Standby Secondary PAM Server Fails
- Restore from Backup File
Introduction
When a PAM Server in your HA Pair fails for whatever reason, the recovery procedure will differ and be dependant upon which server has failed - active or standby.
Click on one of the following recovery procedures based on your failure:
Active Primary PAM Server fails
In BAU, the active is the Primary server which receives all the user traffic. If the active server goes down, all user connections will be disconnected. Therefore, you will need to failover to the standby server which will allow users to continue normal operations while the Primary server is being fixed.
Note
This recovery assumes that the active server is no longer working and can not be fixed. The virtual appliance is offline and will be deleted.
The recovery steps for this scenario are as follows:
- Failover to the Secondary PAM Server
- Create a replacement Primary PAM Server
- Failback to the replacement Primary PAM Server
Failover to the Secondary PAM Server
To allow your PAM users to continue working, the first thing to do will be to failover to the standby server.
-
Open up a web browser and enter the address of the Secondary server:
[PAM Server Address]:8443You will be presented with the Management Interface.
-
Login with a username and password.
Note
PAM user must belong to the PAM Owner group that gives them Owner role level access to PAM.

-
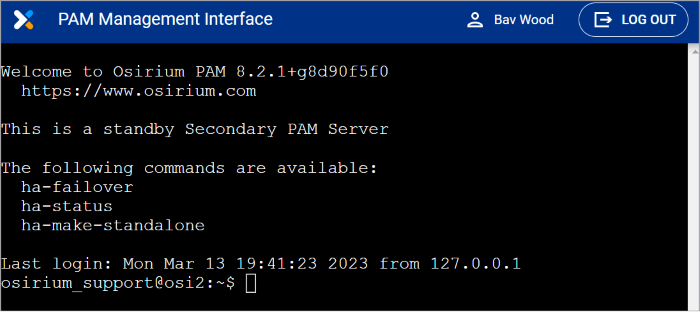
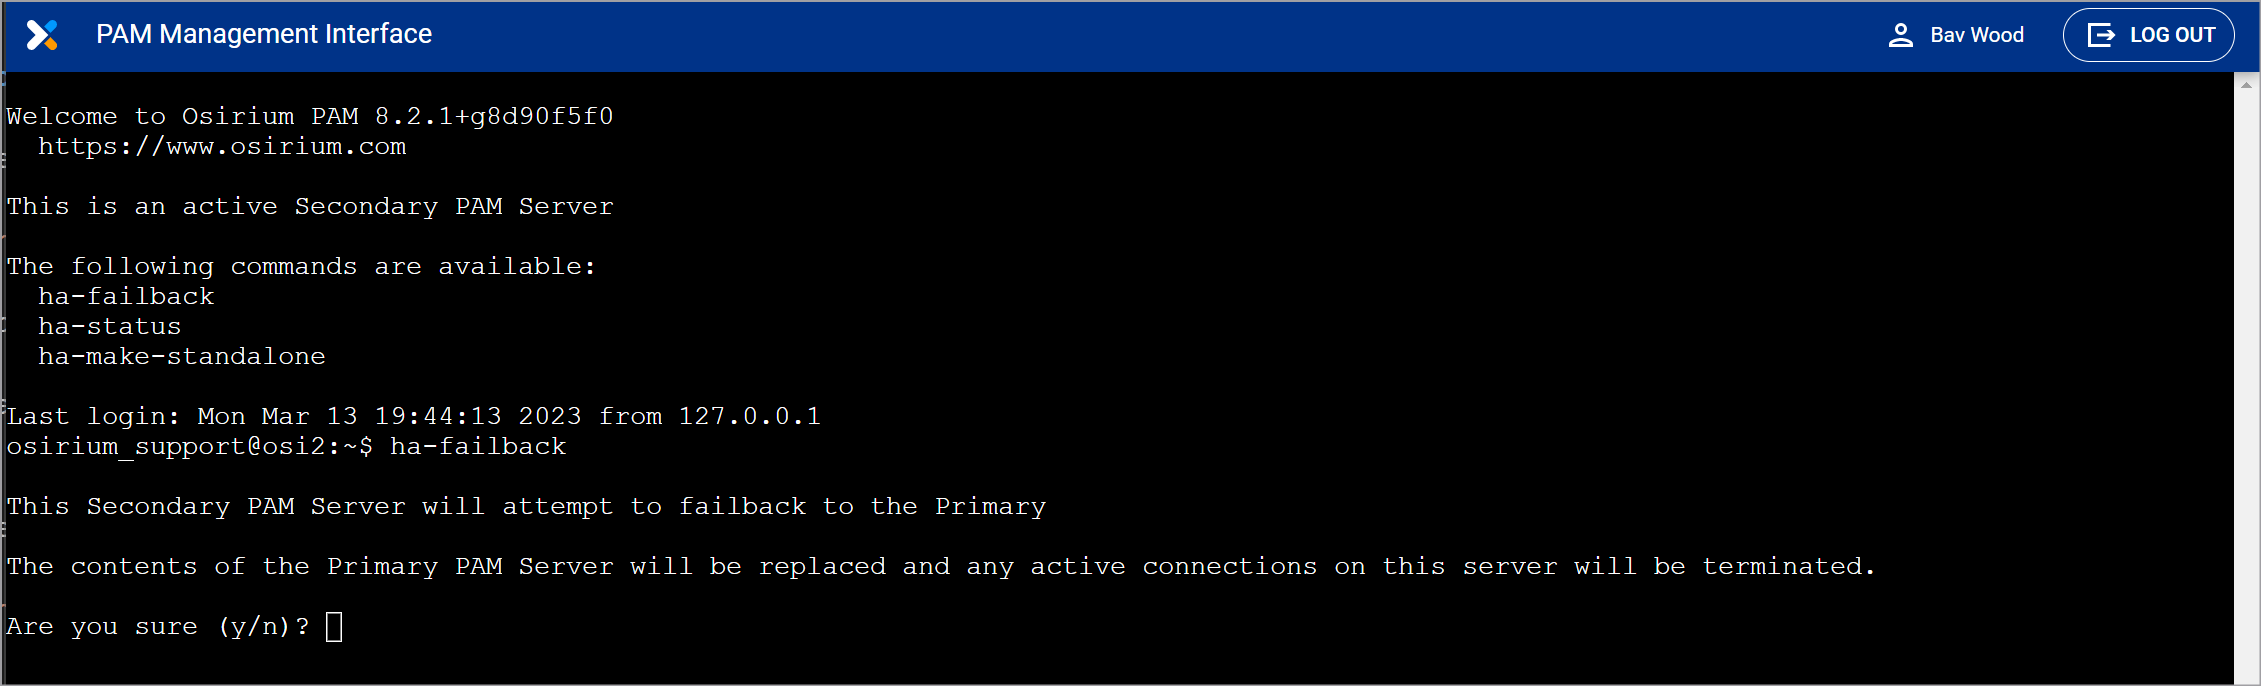
You will be presented with Management Interface SSH window.
-
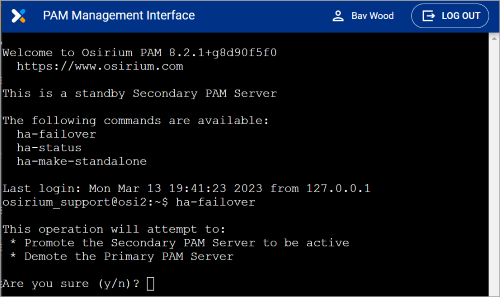
At the prompt type ha-failover and press ENTER.
-
Read what will happen during the failover, then type y and press ENTER to continue.
-
Wait while the Secondary server is promoted to active.
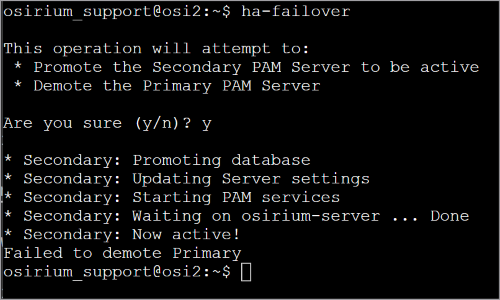
As the Primary server has gone down and it is not contactable it will not be demoted.
-
Log back onto the Secondary server
[https://PAM-Server-Address] -
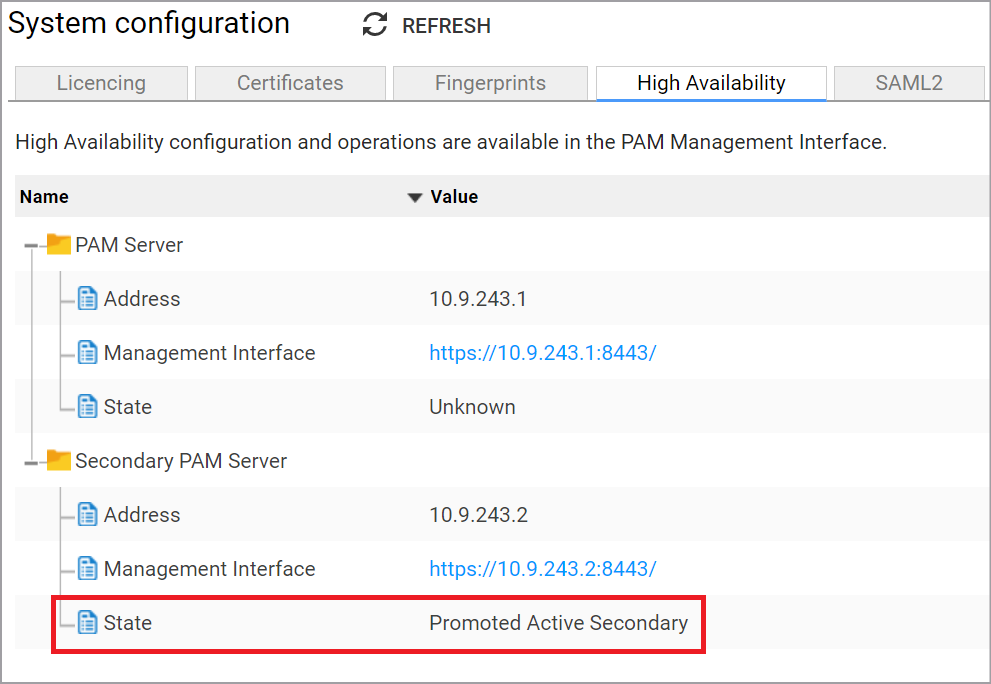
Select PAM Server > Browser (HTTP) to open up the Admin Interface.
-
Within the Admin Interface navigate to System configuration > High Availability tab which will show that the Secondary PAM Server has been promoted and have a state of Promoted Active Secondary.
-
Backup the Secondary server. We recommend you have a recent PAM Server backup file as well as VM level backup or snapshot.
-
Your users can now log back onto PAM.
-
If you are using a floating IP address, users can log back into PAM using the same IP address.
[PAM Server Floating IP Address] -
If you are NOT using a floating IP address then you will have to inform all your users of the IP address of the promoted Secondary PAM Server so they can log back onto PAM.
[PAM Server Secondary IP Address]
-
-
Delete the Primary virtual appliance.
Create a replacement Primary PAM Server
Prerequisites
To create a replacement Primary server, you will need the following:
| Prerequisite | Description |
|---|---|
| Hardware & Software | Ensure the correct resources are available before deploying. The following outlines the hardware and software requirements.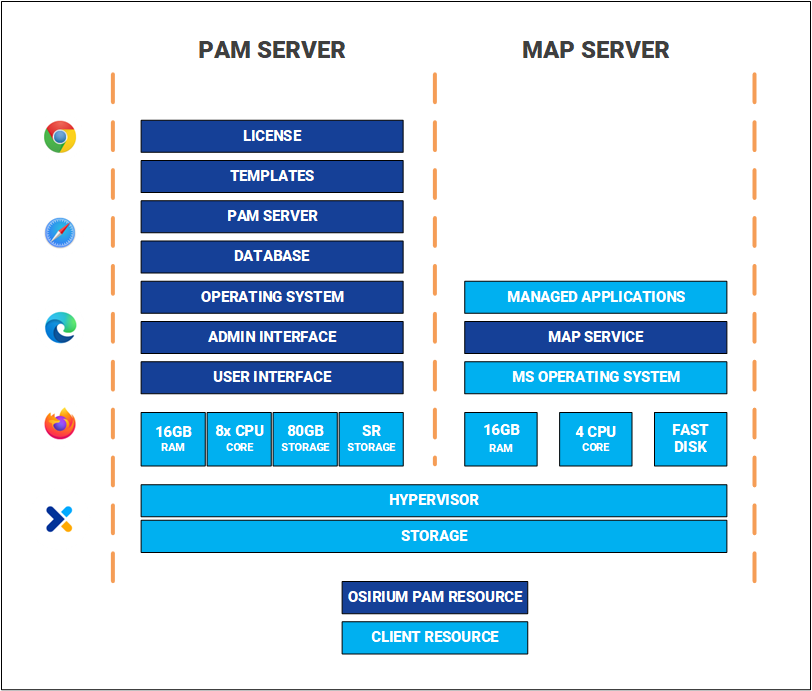 |
| Ports | For information on the ports required by PAM and used between PAM components click here. |
| Software downloads | The software installation package is supplied in Open Virtual Appliance (OVA) and Virtual hard disk (VHD) formats, ready for deployment into your existing virtual infrastructure. To implement a PAM HA Pair you must use release version 8.2 or above. To download the latest software, click here. NOTE: SHA256 checksum is available to verify the integrity of the download. |
| Disk space | Ensure the internal disk has a minimum of 5GB free disk space. |
Deploying the PAM Server
The first step will be to deploy the software package into your chosen supported infrastructure. Click on the appropriate link below to be navigated to the deployment steps.
- Deploy using VMware vSphere
- Deploy using Microsoft Azure
- Deploy using Microsoft Hyper-V
- Deploy using Amazon Web Services
- Deploy using Nutanix Prism Central
Configure the replacement Primary server
Follow these configuration steps if you are setting up a replacement Primary server.
-
Within the Console window, press ENTER when prompted to start the setup and configuration.
-
Read and accept the EULA to continue.
-
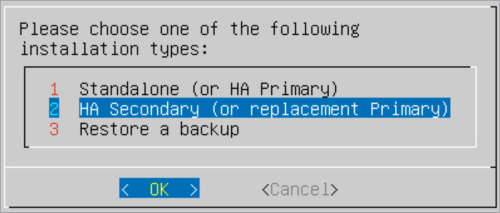
Select HA Secondary (or replacement Primary) as the installation type.
-
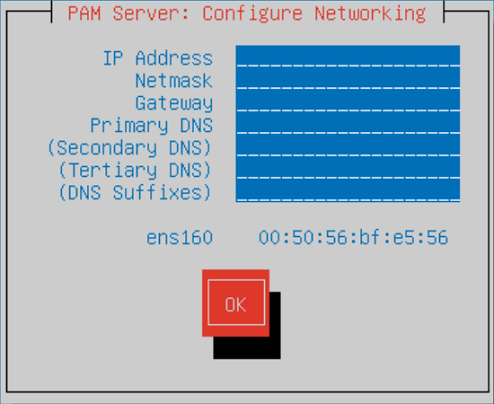
Within the Configure Networking screen, configure the following server settings. Press TAB to navigate between the fields.
- IP Address: Enter the IP Address which will be used to connect to the server.
- Netmask: Enter the network mask.
- Gateway: Enter the network default gateway IP address.
- Primary DNS: Enter the network primary DNS IP address.
- (Secondary DNS): Enter the secondary DNS IP address if relevant, else leave blank.
- (Tertiary DNS): Enter the tertiary DNS IP address if relevant, else leave blank.
- (DNS Suffixes): Enter the DNS Suffixes. Multiple entries can be separated with a comma, else leave blank.
Note
If you are using a .local domain, DNS suffixes MUST be added.
-
Once completed TAB down to the
OKbutton and press ENTER. -
Within the Enter a hostname window, enter a name to identify the new server.
-
TAB down to the
OKbutton and press ENTER. -
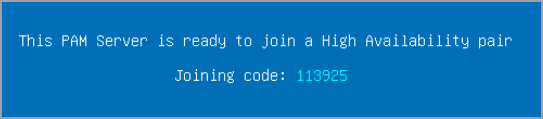
Once the setup has completed a message will be displayed. Your system is now ready for High Availability configuration.
Make a note of the joining code displayed on the screen as it will be required to re-initialise your PAM Server HA Pair.If the joining code is not available then run the following command in the Management Interface command to create one : ha-create-joining-code .
Failback to the replacement Primary PAM Server
-
Before you failback to the new Primary server ensure all users have been disconnected.
-
Backup the Secondary server. We recommend you have a recent PAM Server backup file as well as VM level backup or snapshot.
-
Open up a web browser and enter the address of the Secondary server:
[Secondary PAM Server Address]:8443You will be presented with the Management Interface.
-
Login with a username and password.
Note
PAM user must belong to the PAM Owner group that gives them Owner role level access to PAM.

-
You will be presented with Management Interface SSH window.
-
At the prompt type ha-failback and press ENTER.
-
Read what will happen during the failback process, then type y and press ENTER to continue.
-
As this is a new PAM Server and a replacement for the failed Primary, you will be asked to enter the IP address and joining code of the Primary server.
Type y and press ENTER to continue.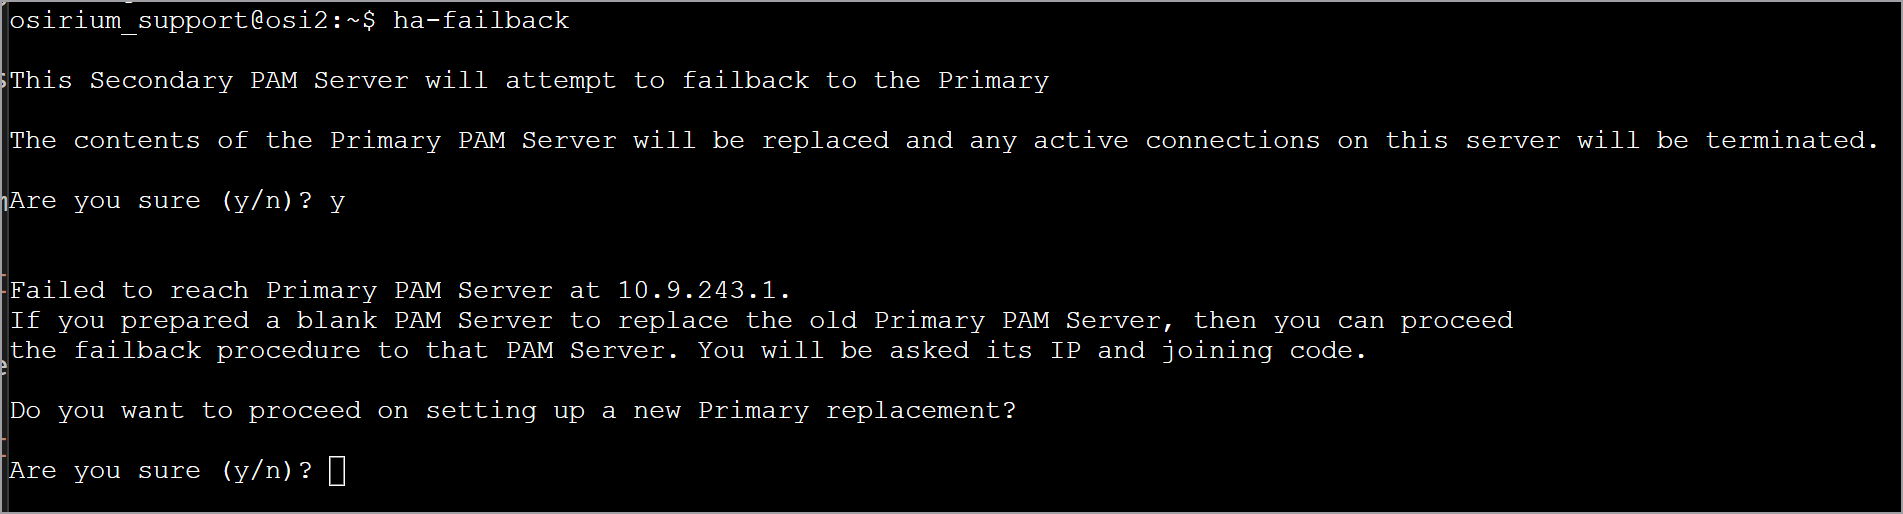
-
Enter the IP address of the new Primary server and press ENTER.
-
Enter the joining code of the new Primary server and press ENTER.

-
Wait while HA failbacks from the Secondary to the replaced Primary server.
-
Backup the Primary server. We recommend you have a recent PAM Server backup file as well as VM level backup or snapshot.
-
Your users can now log back onto PAM.
-
If you are using a floating IP address, users can log back into PAM using the same IP address.
[PAM Server Floating IP Address] -
If you are NOT using a floating IP address then you will have to inform all your users of the IP address of the new Primary server so they can log back onto PAM.
[PAM Server Secondary IP Address]
-
Standby Secondary PAM Server Fails
In BAU, the standby is the Secondary server which receives replication data from the active Primary server. If the standby server goes down, there will be no disruption to user connections. Replication will stop until the server is reinstated.
Note
This recovery assumes that the standby server is no longer working and can not be fixed. The virtual appliance is offline and will be deleted.
The recovery steps for this scenario is as follows:
Create a replacement Secondary PAM Server
Prerequisites
To create a replacement Secondary server, you will need the following:
| Prerequisite | Description |
|---|---|
| Hardware & Software | Ensure the correct resources are available before deploying. The following outlines the hardware and software requirements. |
| Ports | For information on the ports required by PAM and used between PAM components click here. |
| Software downloads | The software installation package is supplied in Open Virtual Appliance (OVA) and Virtual hard disk (VHD) formats, ready for deployment into your existing virtual infrastructure. To implement a PAM HA Pair you must use release version 8.2 or above. To download the latest software, click here. NOTE: SHA256 checksum is available to verify the integrity of the download. |
| Disk space | Ensure the internal disk has a minimum of 5GB free disk space. |
Deploying the PAM Server
The first step will be to deploy the software package into your chosen supported infrastructure. Click on the appropriate link below to be navigated to the deployment steps.
- Deploy using VMware vSphere
- Deploy using Microsoft Azure
- Deploy using Microsoft Hyper-V
- Deploy using Amazon Web Services
- Deploy using Nutanix Prism Central
Configure the replacement Secondary
Follow these configuration steps if you are creating a replacement Secondary server.
-
Within the Console window, press ENTER when prompted to start the setup and configuration.
-
Read and accept the EULA to continue.
-
Select HA Secondary (or replacement Primary) as the installation type.
-
Within the Configure Networking screen, configure the following server settings. Press TAB to navigate between the fields.
- IP Address: Enter the IP Address which will be used to connect to the server.
- Netmask: Enter the network mask.
- Gateway: Enter the network default gateway IP address.
- Primary DNS: Enter the network primary DNS IP address.
- (Secondary DNS): Enter the secondary DNS IP address if relevant, else leave blank.
- (Tertiary DNS): Enter the tertiary DNS IP address if relevant, else leave blank.
- (DNS Suffixes): Enter the DNS Suffixes. Multiple entries can be separated with a comma, else leave blank.
Note
If you are using a .local domain, DNS suffixes MUST be added.
-
Once completed TAB down to the
OKbutton and press ENTER. -
Within the Enter a hostname window, enter a name to identify the new server.
-
TAB down to the
OKbutton and press ENTER. -
Once the setup has completed a message will be displayed. Your system is now ready for HA configuration.
Make a note of the joining code displayed on the screen as it will be required to initialise your HA pair.
Initialise High Availability
Once you have recreated your Secondary server, you will need to initialise your HA pair to setup replication again.
-
Open up a web browser and enter the address of the Primary server:
[Primary PAM Server Address]:8443You will be presented with the Management Interface.
-
Login with a username and password.
Note
PAM user must belong to the PAM Owner group that gives them Owner role level access to PAM.
-
You will be presented with Management Interface SSH window.
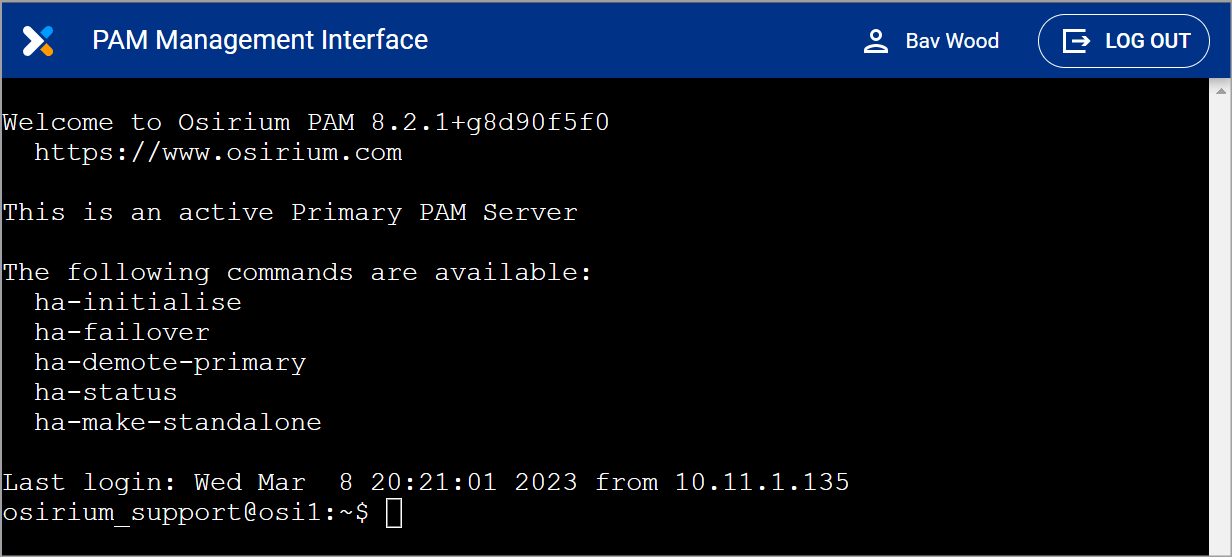
-
At the prompt type ha-initialise and press ENTER.
Note
If you don't have an SMB filestore configured you will be prompted with a warning. We recommend an SMB filestore is configured before continuing.
-
Enter the IP address of the Secondary server and press ENTER.

-
OPTIONAL Enter a floating IP address and press ENTER.
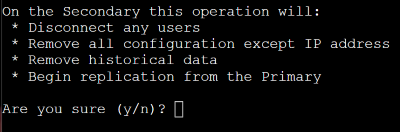
-
Read what will happen on the secondary then type y and press ENTER to continue.
-
Enter the joining code of your Secondary server which can be found on the server console window and press ENTER.

-
Wait while the joining procedure completes.
-
When the operation has completed, you will be asked to confirm you can connect to the Management Interface of the Secondary server. Follow the instructions on screen and log in.
Note
PAM user must belong to the PAM Owner group that gives them Owner role level access to PAM.
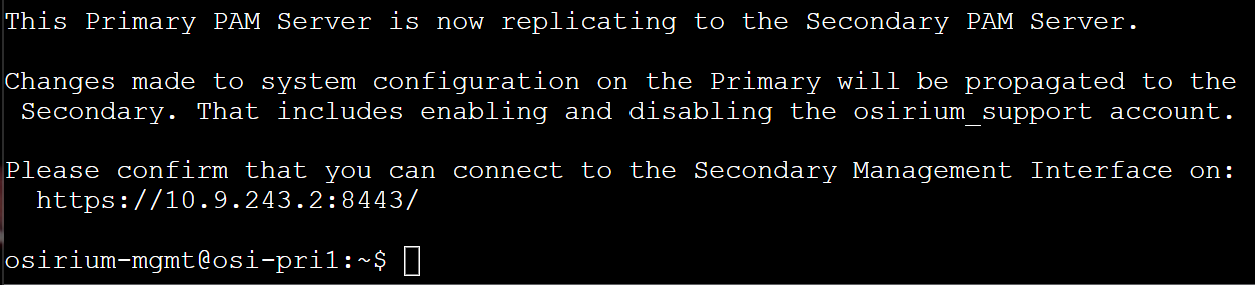
The message on the Secondary server console window will also change and state the PAM Server is in standby.
-
Backup the Primary server. We recommend you have a recent PAM Server backup file as well as VM level backup or snapshot.
Restore from Backup File
If both PAM Servers in your HA Pair fail then a PAM Server backup file will be required to restore your system.
The recovery steps for this scenario is as follows:
- Deploy two PAM Servers
- Configure replacement Primary using Backup File
- Configure Replacement Secondary
- Initialise High Availability
- Post restore tasks
Deploy two PAM Servers
Prerequisites
The following will be required for the PAM Server.
| Prerequisite | Description |
|---|---|
| Hardware & Software | Ensure the correct resources are available before deploying. The following outlines the hardware and software requirements. |
| Ports | For information on the ports required by PAM and used between PAM components click here. |
| Software downloads | The software installation package is supplied in Open Virtual Appliance (OVA) and Virtual hard disk (VHD) formats, ready for deployment into your existing virtual infrastructure. To implement a PAM HA Pair you must use release version 8.2 or above. To download the latest software, click here. NOTE: SHA256 checksum is available to verify the integrity of the download. |
| Disk space | Ensure the internal disk has a minimum of 5GB free disk space. |
| Recent Osirium PAM Server backup file | Ensure the latest Osirium PAM Server backup file is available and accessible. |
| Master Encryption Key | Ensure you have the Master Encryption Key (MEK) of your HA Pair. |
Deploy Two PAM Servers
The first step will be to deploy the software package into your chosen supported infrastructure and build two PAM virtual appliances. Click on the appropriate link below to be navigated to the deployment steps.
- Deploy using VMware vSphere
- Deploy using Microsoft Azure
- Deploy using Microsoft Hyper-V
- Deploy using Amazon Web Services
- Deploy using Nutanix Prism Central
Configure replacement Primary using Backup File
Follow these configuration steps if you are setting up a replacement Primary.
-
Within the Console window, press ENTER when prompted to start the setup and configuration.
-
Read and accept the EULA to continue.
-
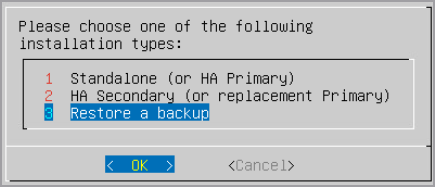
Select Restore a backup as the installation type.
-
Within the Configure Networking screen, configure the following server settings. Press TAB to navigate between the fields.
- IP Address: Enter the IP Address which will be used to connect to the server.
- Netmask: Enter the network mask.
- Gateway: Enter the network default gateway IP address.
- Primary DNS: Enter the network primary DNS IP address.
- (Secondary DNS): Enter the secondary DNS IP address if relevant, else leave blank.
- (Tertiary DNS): Enter the tertiary DNS IP address if relevant, else leave blank.
- (DNS Suffixes): Enter the DNS Suffixes. Multiple entries can be separated with a comma, else leave blank.
Note
If you are using a .local domain, DNS suffixes MUST be added.
-
Once completed TAB down to the
OKbutton and press ENTER. -
When you get to the PAM Server Restore screen, SFTP onto the virtual appliance using the details shown on the screen.
-
Copy the PAM Server backup file of the PAM Server you want to restore. Once successfully copied, the screen will update and the backup file will appear in the list.
-
Select the backup file and press ENTER. When prompted press ENTER to confirm the restore.
-
Enter the Master Encryption Key (including dashes) of the PAM Server that the backup was taken from. Select
OKand press ENTER. -
Within the Enter a hostname window, enter a name to identify the server.
-
Press ENTER. Wait while the system is configured and restored with the backup file. This is now a standalone PAM Server.
Configure Replacement Secondary
Follow these configuration steps to create the replacement Secondary server.
-
Within the Console window, press ENTER when prompted to start the setup and configuration.
-
Read and accept the EULA to continue.
-
Select HA Secondary (or replacement Primary) as the installation type.
-
Within the Configure Networking screen, configure the following server settings. Press TAB to navigate between the fields.
- IP Address: Enter the IP Address which will be used to connect to the server.
- Netmask: Enter the network mask.
- Gateway: Enter the network default gateway IP address.
- Primary DNS: Enter the network primary DNS IP address.
- (Secondary DNS): Enter the secondary DNS IP address if relevant, else leave blank.
- (Tertiary DNS): Enter the tertiary DNS IP address if relevant, else leave blank.
- (DNS Suffixes): Enter the DNS Suffixes. Multiple entries can be separated with a comma, else leave blank.
Note
If you are using a .local domain, DNS suffixes MUST be added.
-
Once completed TAB down to the
OKbutton and press ENTER. -
Within the Enter a hostname window, enter a name to identify the new server.
-
TAB down to the
OKbutton and press ENTER. -
Once the setup has completed a message will be displayed. Your system is now ready for High Availability.
Make a note of the joining code displayed on the screen as it will be required to initialise your HA pair.
Initialise High Availability
Once you have configured the replacement Primary and Secondary servers, the final step is to initialise HA to setup replication.
-
Open up a web browser and enter the address of the Primary server:
[PAM Server Address]:8443You will be presented with the Management Interface.
-
Login with a username and password.
Note
PAM user must belong to the PAM Owner group that gives them Owner role level access to PAM.
-
You will be presented with Management Interface SSH window.
-
At the prompt type ha-initialise and press ENTER.
-
Enter the IP address of the Secondary server and press ENTER.
-
OPTIONAL Enter a floating IP address and press ENTER.
-
Read what will happen on the Secondary server then type y and press ENTER to continue.
-
Enter the joining code of your Secondary server which can be found on the server console window and press ENTER.
-
Wait while the joining procedure completes.
-
When the operation has completed, you will be asked to confirm you can connect to the Management Interface of the Secondary server .
Follow the instructions on screen and log in using the superadmin username and password set on the Primary server during configuration.The message on the Secondary server console window will also change and state the server is in standby.
Post restore tasks
Once the HA Pair has been restored, logon to the active Primary server and check the following before allowing users to reconnect.
| Post upgrade task | Description |
|---|---|
| Trigger AD audit | Before opening any device connections that use an Active Directory account, an audit needs to be manually triggered on all provisioned Active Directories. You can do this by right clicking the Active Directory on the Manage Active Directory page, and select Trigger audit from the menu. |
| Check device states | Check device status to ensure they are running successfully. |
| Check user connections | Check users can connect to devices. |
| Backup | Run the Osirium PAM Server backup task as well as VM level backup on the restore active server. |