Upgrading from a Standalone PAM to PAM HA Pair
This section looks at how to upgrade from an existing standalone PAM Server to a PAM HA Pair configuration.
Prerequisites
Before you can configure a PAM HA Pair you will need the following prerequisites:
| Prerequisite | Description |
|---|---|
| Upgrade path | Review the Upgrade paths to ensure you are applying the correct upgrade method based on the version you are upgrading from and to. |
| Hardware and Software | Ensure the correct resources are available before upgrading. The following outlines the hardware and software requirements.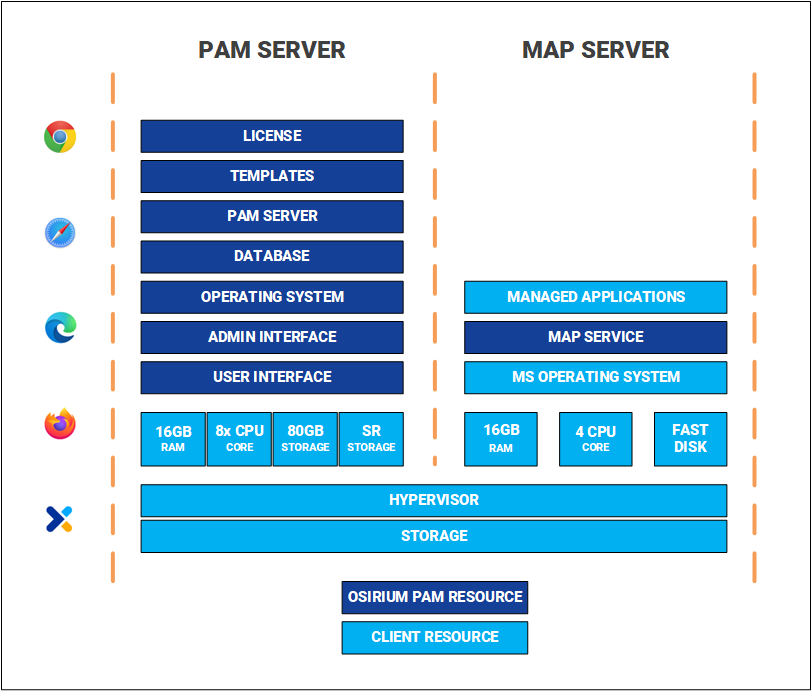 |
| Software downloads | Use the pam-kit-downloader command to download the latest upgrade kit onto your PAM Server. |
| Disk space | Ensure the internal disk has a minimum of 5GB free disk space. |
| Recent backup | We recommend that you have a recent PAM backup as well as VM level backup or snapshot of the standalone PAM Server being upgraded. |
| No active user connections | Ensure there are no active user connections. |
| Disable Task 'Regenerate Account Credentials for all devices' | Within the Admin Interface, disable all scheduled Regenerate Account Credentials for all devices tasks within profiles. |
| Osirium Support account | Within the Admin Interface ensure the Osirium Support account has been enabled and a password set. |
| .local DNS domains | If you are using .local DNS domains, ensure matching records have been entered in the DNS Search Suffixes. |
| No Reporter role users | The Reporter role was removed from 9.x and is no longer available, if you are upgrading from an earlier version, any associated user groups configured within this role will have to be removed before upgrading. Upgrades will be blocked if they are not removed. For further information see Managing roles. |
| No user tasks | User tasks have been removed from 9.0.5 and users will no longer see tasks listed in the PAM UI. When upgrading you will be prompted with a notification if there are profiles configured with user tasks that will no longer be valid when the system is upgraded. For further information see Managing removal of User Tasks when upgrading to 9.x. |
We also recommend the following:
| Prerequisite | Description |
|---|---|
| SMB filestore | RECOMMENDED Configure an SMB filestore to store Session Recording files. For instructions click here SMB Filestore. |
| Floating IP address | RECOMMENDED Allocating a floating ip address will allow the ip address to be dynamically assigned to the active PAM Server. This means the user will only need a single ip address when connecting to PAM and not have to switch ip addresses if a failure occurs. |
Upgrade procedure
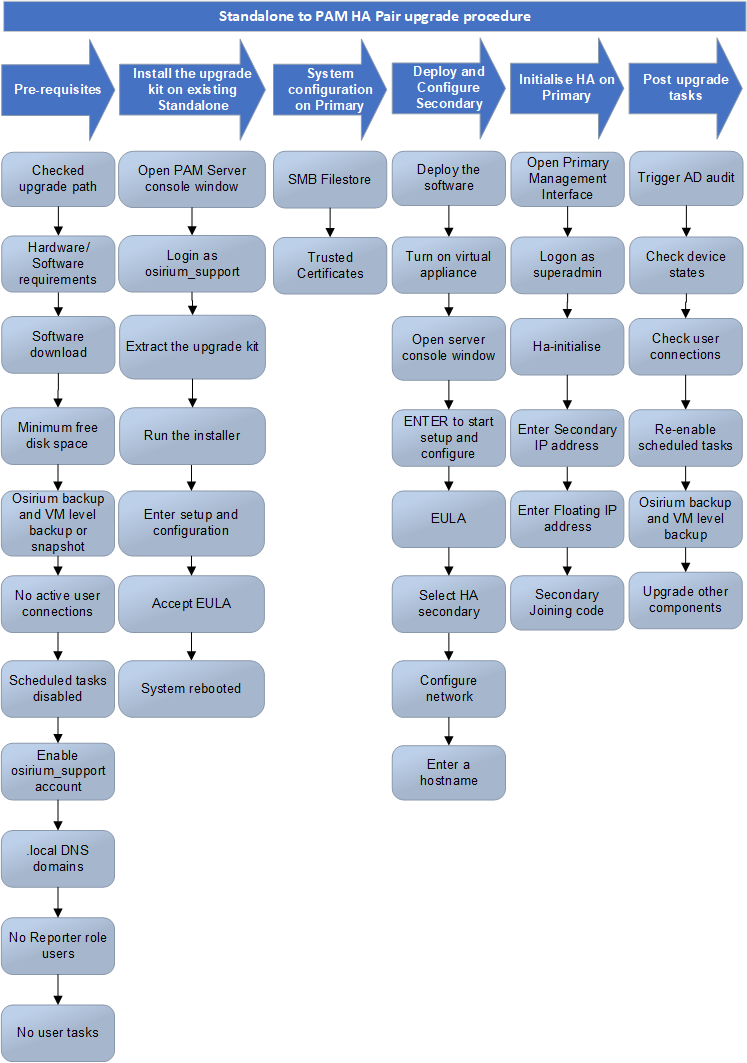
The diagram provides a high-level overview of the process for upgrading a standalone PAM Server to a PAM HA Pair configuration.
Standalone to PAM HA Pair upgrade procedure flowchart
Upgrade steps
- Upgrade the Standalone PAM Server
- SMB Filestore RECOMMENDED
- Deploy Second PAM Server
- Configure the HA Secondary
- Initialise High Availability
Upgrading the Standalone PAM Server
-
Open the PAM Server Console window, then press ALT + F2. The server login prompt appears.
Note
Alternatively, you could use an SSH connection to the PAM Server.
-
Enter osirium_support at the login prompt and press ENTER.
-
When prompted, enter the password of the osirium_support account and press ENTER.
-
Extract the upgrade kit copied to the server using the following command:
sudo bash Osirium_PAM_Server_vA.B.C_upgrade.binWhere A.B.C is the version you are upgrading to.
-
When the kit has been extracted, type the command specified on the screen and press ENTER.
-
Press ENTER when prompted to start the setup and configuration.
-
The EULA screen will be displayed. Press ENTER once you have read it.
-
Wait while the upgrade completes and the server is rebooted.
SMB Filestore RECOMMENDED
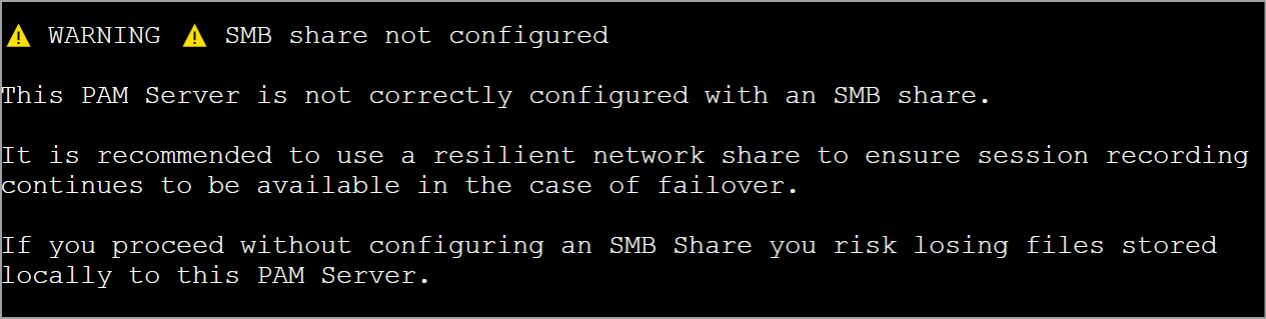
We highly recommend that an SMB filestore is configured to maintain resilience and ensure session recordings continue to be available in case of any failovers.
Warning
If an SMB filestore is not configured then you are at risk of losing files stored locally on the PAM Server.
To configure:
-
Within the Admin Interface navigate to the System configuration > System settings tab.
-
Click on the
 next to SMB share configuration.
 -
Enter the SMB share details.
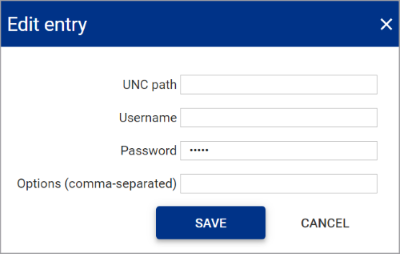
Field name Description UNC path The UNC path by which PAM can connect to the SMB share. For example \server-name\shared-resource-pathname
Username The username of the SMB share location. Password The password of the SMB share location. Options (comma-separated) Optional
Allows additional parameters to be passed to the SMB share as a comma separated list if required. -
Click
SAVE. -
Click on the
next to File store. -
Select SMB Share and click
SAVE.
Deploy Second PAM Server
To create the HA Pair you will need to create a Secondary PAM Server. Deploy the software package into your chosen supported infrastructure. Click on the appropriate link below to be navigated to the deployment steps.
- Deploy using VMware vSphere
- Deploy using Microsoft Azure
- Deploy using Microsoft Hyper-V
- Deploy using Amazon Web Services
Configure the HA Secondary
Follow these configuration steps if you are setting up a Secondary server.
-
Within the Console window, press ENTER when prompted to start the setup and configuration.
-
Read and accept the EULA to continue.
-
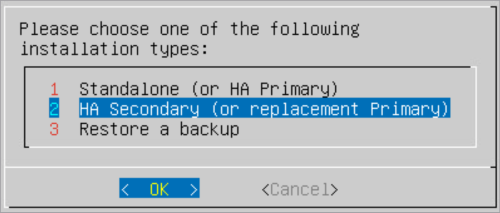
Select HA secondary (or replacement primary) as the installation type.
-
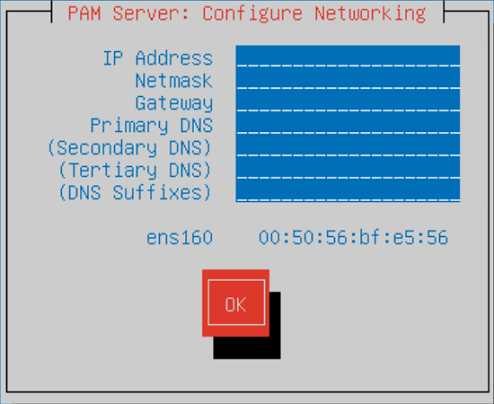
Within the Configure Networking screen, configure the following server settings. Press TAB to navigate between the fields.
- IP Address: Enter the IP Address which will be used to connect to the server.
- Netmask: Enter the network mask.
- Gateway: Enter the network default gateway IP address.
- Primary DNS: Enter the network primary DNS IP address.
- (Secondary DNS): Enter the secondary DNS IP address if relevant, else leave blank.
- (Tertiary DNS): Enter the tertiary DNS IP address if relevant, else leave blank.
- (DNS Suffixes): Enter the DNS Suffixes. Multiple entries can be separated with a comma, else leave blank.
Note
If you are using a .local domain, DNS suffixes MUST be added.
-
Once completed TAB down to the
OKbutton and press ENTER. -
Within the Enter a hostname window, enter a name to identify the new server.
-
TAB down to the
OKbutton and press ENTER. -
Once the setup has completed a message will be displayed. Your system is now ready for High Availability.
Make a note of the joining code displayed on the screen as it will be required to initialise your PAM HA pair.
Initialise High Availability
Once you have upgraded your standalone PAM Server and deployed and configured your Secondary server, the final step is to initialise your HA pair and setup replication.
-
Open up a web browser and enter the address of the Primary server:
[PAM Server Address]:8443You will be presented with the Management Interface.
-
Login with a username and password.
Note
PAM user must belong to the PAM Owner group that gives them Owner role level access to PAM.

-
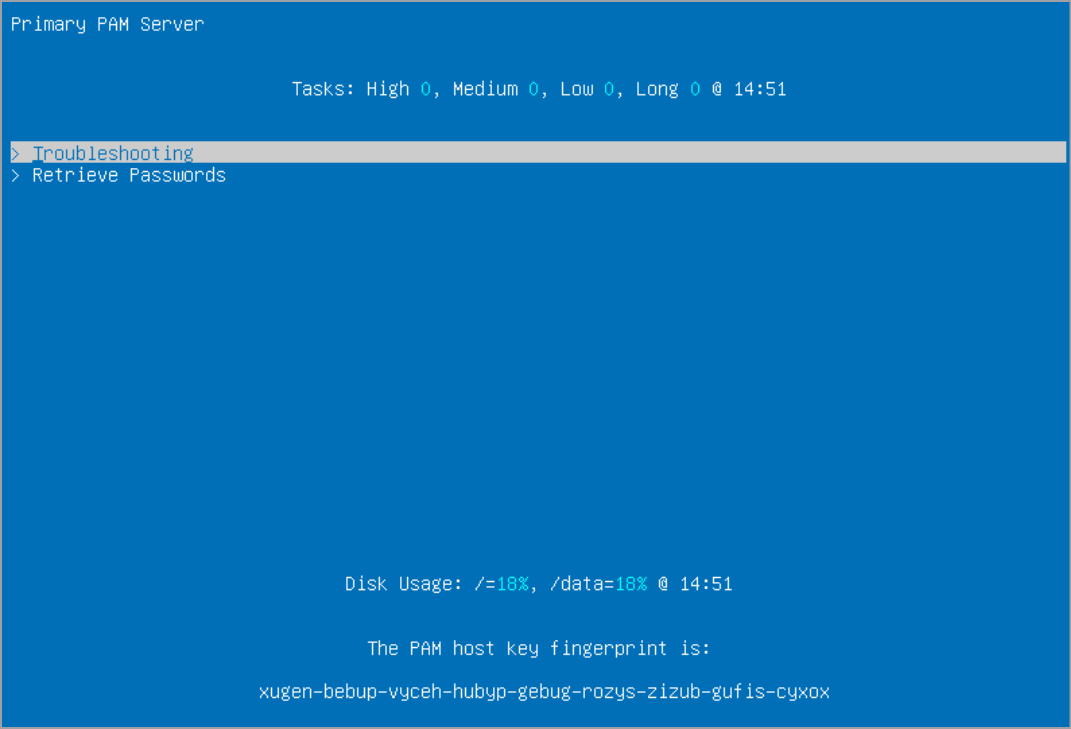
You will be presented with Management Interface SSH window.

-
At the prompt type
ha-initialiseand press ENTER.Note
If an SMB share is not configured you will be presented with a warning message. We recommend you configure an SMB share before continuing.
-
Enter the IP address of the Secondary server and press ENTER.

-
Enter a floating IP address and press ENTER.
-
Read what will happen on the Secondary server then type y and press ENTER to continue.

-
Enter the joining code of your Secondary server which can be found on the server console window and press ENTER.

-
Wait while the joining procedure completes.
-
When the operation has completed, review the follow-up actions listed and complete as required.
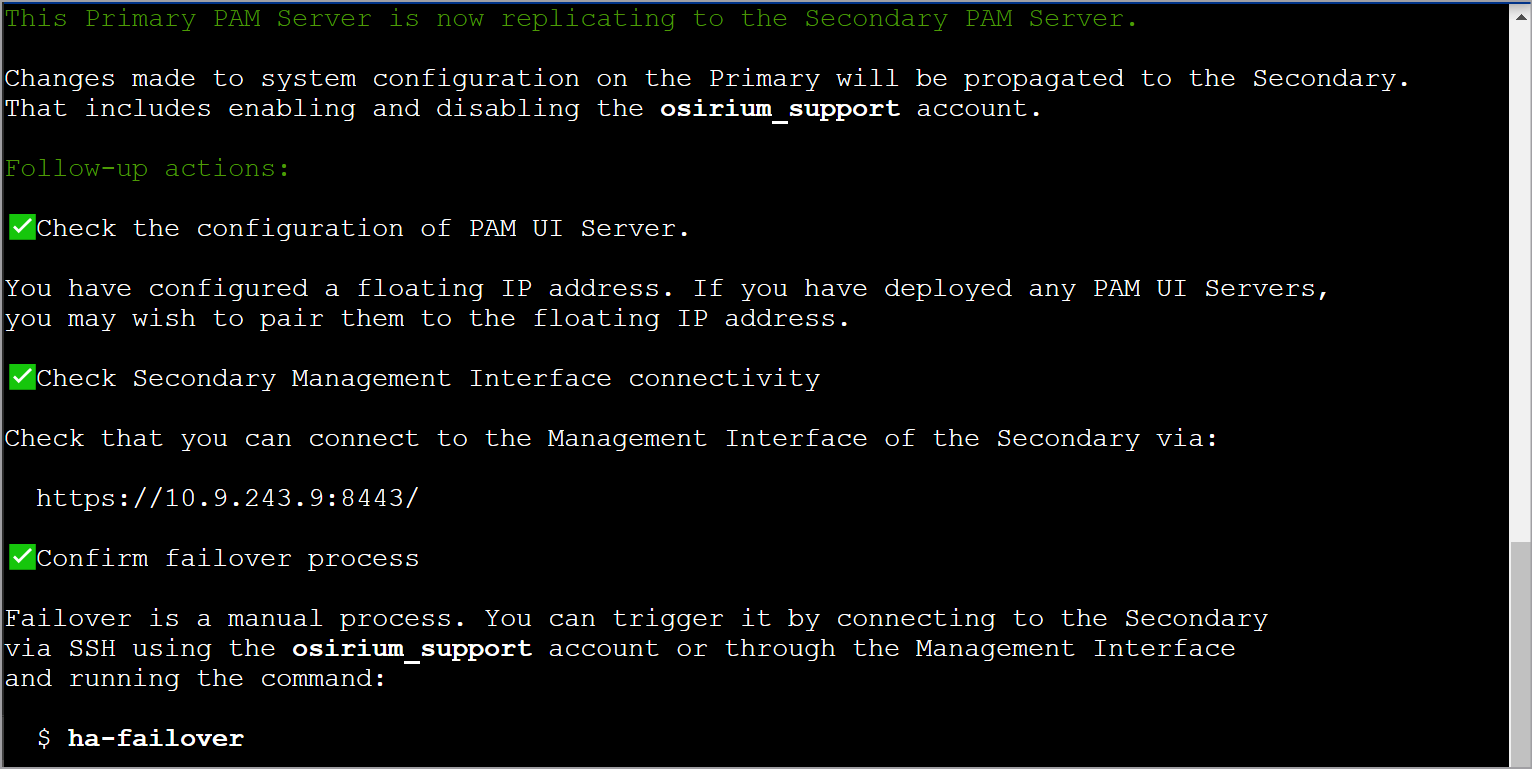
HA Pair configuration is now complete.
Post upgrade tasks
Once the PAM Server upgrade to a HA Pair has successfully completed, log on to the Primary server and check the following before allowing users to reconnect:
| Post upgrade task | Description |
|---|---|
| Trigger AD audit | Before opening any device connections that use an Active Directory account, an audit needs to be manually triggered on all provisioned Active Directories. You can do this by right clicking the Active Directory on the Manage Active Directory page, and select Trigger audit from the menu. |
| Check device states | Check device status to ensure they are running successfully. |
| Check user connections | Check users can connect to devices. |
| Re-enable scheduled tasks | Re-enable scheduled Regenerate Account Credentials for all devices tasks. |
| Backup | Run the Osirium PAM Server backup task as well as VM level backup of both the HA Pair PAM Servers. |
| Upgrade PAM UI | If you are using a standalone PAM UI Server then use the PAM Component Compatibility Matrix to check if the PAM UI Server needs updating inline with the PAM version you have upgraded to. Upgrade as appropriate. |
| Upgrade MAP Server | If you are using a MAP Server then use the PAM Component Compatibility Matrix to check if the MAP Server needs updating inline with the PAM version you have upgraded to. Upgrade as appropriate. |