System configuration of the PAM UI Server
Configuration of the PAM UI Server should take around 5 minutes.
- Install HTTPS certificates
- Pair PAM UI with a specific PAM Server OPTIONAL
- Securing against man-in-the-middle (MITM) attacks OPTIONAL
Install HTTPS certificates
Although default HTTPS certificates are installed during the installation to ensure your data to and from the PAM UI is encrypted, it is recommended that you install your own certificates before you start to use your PAM UI Server.
To install your HTTPS certificates:
-
In order to replace the existing HTTPS certificate files on the PAM UI Server you will first need to ensure they are in PEM format and rename them to https.key and https.crt to match the existing files.
-
Now open your preferred SFTP tool and enter the following:
- IP address of the PAM UI Server.
- Enter support as the login username.
- Select the private key file (.ppk file) for authentication.
-
Transfer your https.key and https.crt files onto the PAM UI Server.
-
Close the SFTP window.
-
Now open your preferred SSH tool and enter the following:
- IP address of the PAM UI Server.
- Enter support as the login username.
- Select the private key file (.ppk file) for authentication.
-
Within the command line tool window, backup the existing files before you overwrite the existing HTTPS certificate files.
sudo mv /var/disk/certs/https.crt /var/disk/certs/https.crt.baksudo mv /var/disk/certs/https.key /var/disk/certs/https.key.bak -
Now move your own https.crt and https.key files into the
/var/disk/certs/folder.sudo mv /https.* /var/disk/certs/ -
Navigate to the certs folder.
cd /var/disk/certs/ -
Set the files permission and ownership.
sudo chmod 0600 https.keysudo chmod 0644 https.crtsudo chown root:root https.keysudo chown root:root https.crt -
Reboot the PAM UI Server to apply the configuration and wait while the system is rebooted.
sudo reboot
Pair PAM UI with a specific PAM Server OPTIONAL
The PAM UI Server supports connecting to multiple PAM Servers, however it is possible to bind a single instance of the PAM UI Server to a given PAM Server. In order to do so, we need to save the PAM host to /var/disk/settings/pxm_host.
-
Open the Console window of the PAM UI Server.
-
At the command prompt open the pxm_host file in
/var/disk/settings/using your preferred editor.Example:
sudo nano /var/disk/settings/pxm_host -
Add your PAM Server IP address to the host file.
-
Save the changes and exit the file.
-
At the command prompt type
sudo rebootto apply the configuration. Wait while the system is rebooted.
Securing against man-in-the-middle (MITM) attacks OPTIONAL
Although this is optional, to avoid MITM attacks between the PAM UI and a given PAM Server implement the following to improve security:
-
Open the Console window of the PAM UI Server.
-
At the command prompt open the host.yml file in
/var/disk/settings/using your preferred editor.Example:
sudo nano /var/disk/settings/hosts.yml -
The PAM UI Server is configured by default to enable (allow_insecure: true) all connections as we do not have any stored fingerprints. To disable this setting we need to set it to
false(allow_insecure: false) and then add the PAM Server hostname (FQDN or IP address) and host key fingerprint to the list.If you have multiple PAM Servers then add the hostnames and the host key fingerprints of each of the PAM Servers you will be connecting to this list.
The host key fingerprint can be obtained from the Osirium PAM. Open a web browser window and enter the following:
https://[PAM_Server_address/downloads].
Example
Replace the example hostnames (FQDNs or IP Addresses) and host key fingerprints with your own PAM Servers.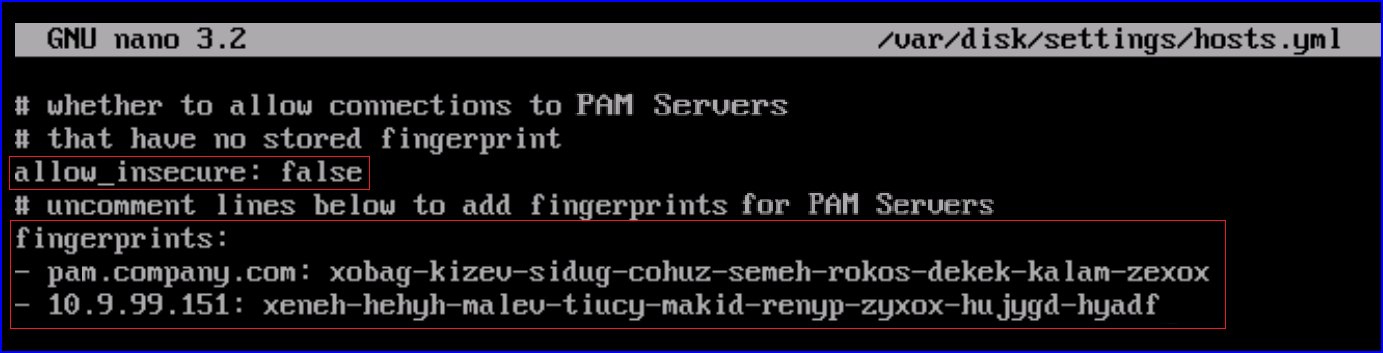
-
Once updated, save the changes within your editor.